
 Sign in
 CIMD2 SMS client
The CIMD2 protocol is and SMS protocol that enables you to connect to Nokia SMSCs. In Europe many mobile networks use this protocol to offer IP SMS services to customers. This guide explains, how you can connect to the mobile network that offers IPS SMS services through the CIMD2 protocol. You will also find direct download links to the protocol specifications.
What is a CIMD2 connection?
A CIMD2 connection is TCP/IP connection to the short message service centre (SMSC) of a mobile network operator. It allows your Ozeki SMS Gateway system to connect directly your mobile network operator's SMSC.
What does CIMD2 stand for?
CIMD stands for Computer Interface to Message Distribution. CIMD2 stands for version two of this protocol. This is protocol is implemented by Ozeki SMS Gateway.
How to send SMS with CIMD2 connection (Easy steps)
To send SMS with CIMD2 connection:
- Browse https://localhost:9515
- Login using your username and password
- Add new connection in the connections panel
- Select "CIMD2 client"
- Type in the CIMD2 server details
- Specify the telephone number
- Click ok to save your entries
- Send a test SMS message
How to send SMS through a CIMD2 client
This system works in a way that the user gives their computer instructions on sending a message (Figure 1). The computer forwards this information to an SMS Centre. This is done through a CIMD2 (Computer Interface to Message Distribution) client connection. The SMSC then sends the text message to the recipients' mobile devices.

How to setup a CIMD2 client in Ozeki SMS Gateway (video tutorial)
In this short video you will learn how to set up a CIMD2 client in Ozeki SMS Gateway, as well as use it to send text messages. First we configure and install a new CIMD2 client connection. Then we use this connection to send SMS to a phone number. We can also monitor our actions using the event log, to see if it has been sent successfully.
Create a new connection
The first screenshot shows you how to start the connection procedure to connect your SMS gateway system to an CIMD2 service provider. To do this, you need to create an CIMD2 client connection. To create this new connection, go for the Connections panel in the dashboard and click on the "Add new connection..." link. (Highlighted in Figure 2)

Install the CIMD2 connection
To install the CIMD2 connection, look for the IP SMS connections install section. This section has five install items, CIMD2 client, SMPP client, UCP client, HTTP Server and HTTP client. You have to select the CIMD2 client to continue the installment. (All shown in Figure 3)

Provide CIMD2 Client credentials
Your next step is to provide the CIMD2 Client credentials. To give these details, go for the Install connection's page General tab and you will find the Connect to server. There you can enter these contact details: Host, Port, Username and Password. You have to give the connection's telephone number in the Telephone number groupbox. You can save the details by clicking the Ok button. (Highlighted in Figure 4)

Check that the login was successful
You can check that the login was successful by visiting the CIMD2_client_1 details page's Events tab. Here you have the event log where you can find every notable information about the connection, such as the success of the login procedure. It is advised to study the log carefully to fully understand the latest server events. (Shown in Figure 5)

Send a test message
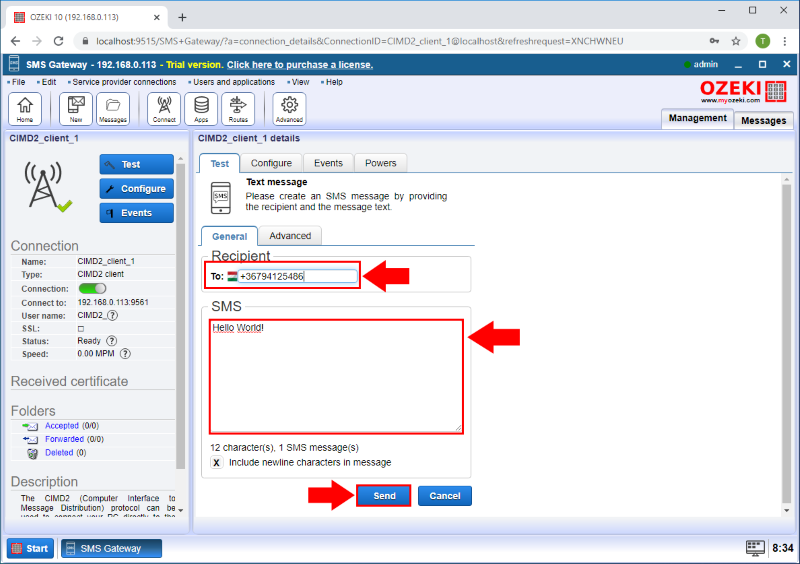
In the CIMD2_client_1 details page, there is the Test tabpage where you can send a test SMS message by choosing the General tab. Provide the recipient's phone number in the Recipient groupbox, the message in the SMS groupbox and click on the Send button to send out this test message. (Highlighted in Figure 6)
Check that the message was sent succesfully
At the final step you can check whether the test message was sent successfully or not. At the bottom of the CIMD2_client_1 details page you will see the exact date of the sending, the status of the message transferring process and the connection. A green check mark indicates that everything went according to the plan. (Figure 7)

Example CIMD2 PDU
An example CIMD PDUs look like the following:
03:007 021:06201234657 033:hello world 53:007 021:06201234657 060:971107130808
Each packet starts with STX (hex 02) and ends with ETX (hex 03). The content of the packet consists of fields separated by TAB (hex 09). Each field, in turn, consists of a parameter type, a colon (:), and the parameter value. Note that the last field must also be terminated with a TAB before the ETX.
In the CIMD2 PDUs two-digit parameter types are operation codes and each message must have exactly one. The number after the operation code is the sequence number used to match an operation to its response. The response code often referred to as acknowledgement of the message is equal to the operation code plus 50.
In the example above, the operation code 03 means submit message. Field 021 defines the destination address (telephone number), with field 033 is the user data (content) of the message. Response code 53 with a field 060 time stamp indicates that the message was accepted; if the message failed, the SMSC would reply with field 900 (error code) instead.
CIMD2 protocol specification
CMID2-protocol-specification.pdf
FAQs
What is an CIMD2 connection?
Developed by Nokia, the Computer Interface Message Distribution (CIMD) protocol
facilitated communication between applications and the Nokia Short Message
Service Center (SMSC). Notably, the CIMD2 version (CIMD version 2) addressed
this need through a dedicated interface.
Benefits for Ozeki:
The CIMD2 interface leverages TCP/IP sockets for message exchange, making it
particularly suitable for client applications like Ozeki SMS Gateway. This
compatibility allows Ozeki to seamlessly send and retrieve SMS messages
through the Nokia SMSC.
In essence, CIMD2 serves as a bridge for Ozeki, enabling it to interact
effectively with the Nokia SMSC for SMS communication.
Summary
As you could read in this guide, CIMD2 connection helps you to send SMS using your computer and Ozeki SMS Gateway. This protocol gives you the opportunity the reach your clients via SMS while the Ozeki SMS Gateway implements the protocol. CIMD2 is capable of delivering different kind of SMS message types, like SMPP and UCP/EMI and Ozeki SMS Gateway is a solid platform which helps this process.
With the explanation and the attached specification, you should be able to set up CIMD2 connection with Ozeki SMS Gateway and send messages. Make sure to check out other articles as well, like UCP and OZX connection.
Your next step is to download Ozeki SMS Gateway and start working!